
Make your own...
Please write your review on the bottom of this page!!!
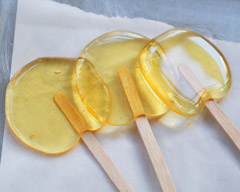
Sour Candy Acid Drops
Serving Size:
Makes about 40 candies
Ingredients:
1. Line two baking sheets with parchment paper and set aside. Combine the water, sugar, corn syrup and cream of tartar in a small saucepan (add food colouring if you want). Cook over medium heat, stirring constantly, until the sugar is dissolved and the mixture begins to bubble. Wash down the sides of the pan with a pastry brush dipped in hot water if sugar crystals have formed on the sides. Clip a candy thermometer to the pan and continue cooking over medium heat, stirring occasionally, until the mixture reaches 150°C.
2. Remove the pan from the heat. Sprinkle the citric acid over the sugar syrup and stir to combine. When the bubbling has subsided, use an oiled teaspoon to drop teaspoonfuls of the sugar syrup onto the prepared sheets 2 inches apart to allow room for spreading.-If you want them round, try your best to shape them with a spoon. Insert lollipop sticks.
3. To store candies, wrap them in sheets of parchment paper, making sure the candies don’t touch, as they will stick together.
Note: Citric acid is available in fairly small quantities on the Internet.
Makes about 40 candies
Ingredients:
- 1/4 cup water
- 1 cup granulated sugar
- 1/2 cup light corn syrup
- 1/4 teaspoon cream of tartar
- 1 teaspoon citric acid (see note)
- White lollipop sticks
- Green Food Colouring (optional)
1. Line two baking sheets with parchment paper and set aside. Combine the water, sugar, corn syrup and cream of tartar in a small saucepan (add food colouring if you want). Cook over medium heat, stirring constantly, until the sugar is dissolved and the mixture begins to bubble. Wash down the sides of the pan with a pastry brush dipped in hot water if sugar crystals have formed on the sides. Clip a candy thermometer to the pan and continue cooking over medium heat, stirring occasionally, until the mixture reaches 150°C.
2. Remove the pan from the heat. Sprinkle the citric acid over the sugar syrup and stir to combine. When the bubbling has subsided, use an oiled teaspoon to drop teaspoonfuls of the sugar syrup onto the prepared sheets 2 inches apart to allow room for spreading.-If you want them round, try your best to shape them with a spoon. Insert lollipop sticks.
3. To store candies, wrap them in sheets of parchment paper, making sure the candies don’t touch, as they will stick together.
Note: Citric acid is available in fairly small quantities on the Internet.
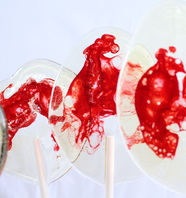
Vampire Blood lollipops
Makes about 12 lollipops
1. Bring sugar, corn syrup, and 1/4 cup water to a boil in a small saucepan, stirring until all the sugar is dissolved completely. If you have a candy thermometer it will register it should read roughly 150° (hard-crack stage), 5 to 7 minutes.
While the sugar is boiling lay out your lollipop sticks onto a silicon baking mat ( I put my baking mat onto a cookie sheet to make it easier to move around and a nice hard level surface. )
2. Once you have placed your lollipop sticks down - Fill a larger pot with ice water. When your sugar mixture is ready - 300 degrees to 310 degrees, immediately set the pan into ice-water bath to stop the cooking (syrup will steam vigorously - be careful of the steam); let sit about 25 seconds. Swirl pan 1 minutes more to cool - it while still be bubbling, that's OK .
3. Working very quickly, pour syrup onto the silicon baking sheets, forming circles (2 to 31/2 inches in diameter) and spacing pours about 3 inches apart - then press in lollipop sticks. I went very randomly - wherever there was space I made a lollipop.
4. The fun part:
With the red food coloring - squirt a few drops in to each lollipop (I would do one at a time to make it easier to work with), using one of the lollipop sticks drags the stick through some of the food coloring to get the desired look for the "blood". I add a few more drops to the blood coagulated look cool.
5. Let Stand for about 5 - 10 minutes for the sugar to harden completely
6. Now - go out there and share your blood lollipops! Say that it's REAL blood!!!
- 2 cups sugar
- 2/3 cup light corn syrup
- red food coloring
- white lollipops stick - you can find them at your local craft store.
1. Bring sugar, corn syrup, and 1/4 cup water to a boil in a small saucepan, stirring until all the sugar is dissolved completely. If you have a candy thermometer it will register it should read roughly 150° (hard-crack stage), 5 to 7 minutes.
While the sugar is boiling lay out your lollipop sticks onto a silicon baking mat ( I put my baking mat onto a cookie sheet to make it easier to move around and a nice hard level surface. )
2. Once you have placed your lollipop sticks down - Fill a larger pot with ice water. When your sugar mixture is ready - 300 degrees to 310 degrees, immediately set the pan into ice-water bath to stop the cooking (syrup will steam vigorously - be careful of the steam); let sit about 25 seconds. Swirl pan 1 minutes more to cool - it while still be bubbling, that's OK .
3. Working very quickly, pour syrup onto the silicon baking sheets, forming circles (2 to 31/2 inches in diameter) and spacing pours about 3 inches apart - then press in lollipop sticks. I went very randomly - wherever there was space I made a lollipop.
4. The fun part:
With the red food coloring - squirt a few drops in to each lollipop (I would do one at a time to make it easier to work with), using one of the lollipop sticks drags the stick through some of the food coloring to get the desired look for the "blood". I add a few more drops to the blood coagulated look cool.
5. Let Stand for about 5 - 10 minutes for the sugar to harden completely
6. Now - go out there and share your blood lollipops! Say that it's REAL blood!!!
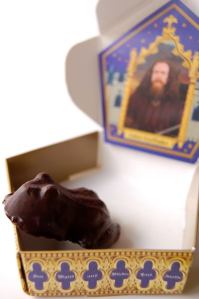
Chocolate Frog
Equipment:
Microwave
Wooden spatula
1-2 Plastic Frog Molds*
Microwave safe mixing bowl
Ingredients:
1 pound of chocolate for melting**
Makes 12 chocolate frogs APPROX.
*Note: You may purchase a plastic frog mold from Amazon.com (see below) or somewhere else for roughly $4 plus shipping and handling.
http://www.amazon.com/gp/product/B003QMMOZ8/ref=oss_product
1. Empty your chocolate into your microwavable safe bowl.
2. Place the chocolate filled bowl in the microwave on high for 30 seconds. After 30 seconds is up, remove the bowl and stir the chocolate. Repeat microwaving for 30 second intervals until chocolate is completely melted.
3. Pour your melted chocolate into your plastic molds. Use a wooden spatula to help pour chocolate.
4. Place molds on a flat surface in the freezer. Wait 30 minutes. Remove chocolate frogs and turn mold upside down onto a plate or other desired serving item. Your chocolate frog should easily fall out onto plate. If it doesn't, gently tap the plastic mold with two fingers until chocolate frog falls out.
Now go and enjoy your magical amphibian treat!
**You need to use Chocolate for MELTING as it holds its shape better.
Chocolate Frog Box Template
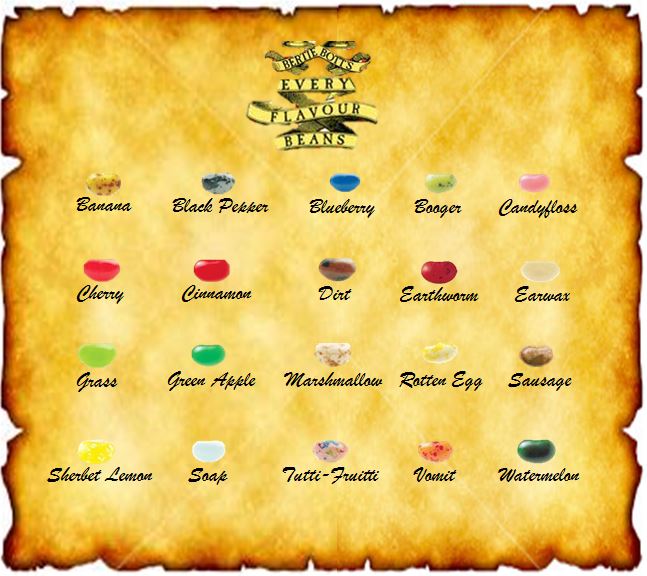
Bertie botts every flavor beans
Unfortunately you can't make Bertie Botts Every Flavor Beans from scratch, but you can buy them from jellybelly.com and sprose them up a bit to make them look more authentic. use the link to find them at an affordable price.
https://www.jellybelly.com/search/go#w=harry%20potter&asug=
UPDATE
Recipe COMING SOON!!!
https://www.jellybelly.com/search/go#w=harry%20potter&asug=
UPDATE
Recipe COMING SOON!!!
Bertie Botts every flavour beans box template
You need:
1. a colour printer
2. thick card stock- preferably glossy (only what your printer can handle!)
3. scissors and, or stanley knife
4. plastic film (ask for it at your local art shop)
5. cello tape
6. glue stick
7. medium sized, 100% transparent plastic bag
1. a colour printer
2. thick card stock- preferably glossy (only what your printer can handle!)
3. scissors and, or stanley knife
4. plastic film (ask for it at your local art shop)
5. cello tape
6. glue stick
7. medium sized, 100% transparent plastic bag
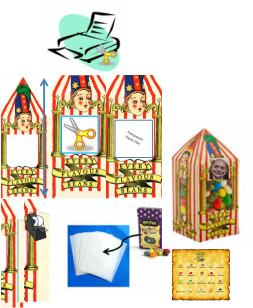
1. Print and cut out template.image1 (the box should be 14cm from point to fold line).image2
2. Cut out the windows on the box.image3(the large white shape in the center of each side)
3. Using a glue stick or tape, stick a piece of plastic film on each window.image4 (enough to cover the whole window)
4. Fold and crease each side of the box so you get four sections
5. Fold and crease the triangle at the top so that when you make a rectangular prisim shape with the box the points will meet
6. Fold and crease all of the flaps.image5
7. Tape and or glue down all the flaps so you get a box with a point at the top.image6
8. Put the jelly beans you got from jellybelly.com into a transparent bag and then put the bag into your authentic box.image7
9. Now print out the flavor chart from the link below and put it in your box of Bertie Botts Every Flavor Beans.image8
Flavor Chart
And Hey presto
Enjoy
.image9
